The Filmit Blog
The Blog
Breakdowns, how-tos, and behind-the-scenes looks at the tools we build and the videos we make.

Meet Slideshow: Build Slideshows in After Effects Automatically
Template packs never fit your exact number of photos. Slideshow builds the slideshow for you instead, as a real, fully editable After Effects composition, in near real time. Here is what the plugin is and the three ways it builds.

How to Make a Slideshow in After Effects (Without the Manual Work)
Build a fully editable slideshow comp in After Effects without keyframing a single cross-dissolve. This is the step-by-step way to make a photo or video slideshow in After Effects using the Slideshow plugin from Filmit.

How to Safely Reduce an After Effects Project (Without Breaking Expressions)
After Effects ships its own Reduce Project command, but it strips out anything referenced only by expressions, so your controllers and rigs come back broken. Here is why that happens and how to shrink a project the safe way with Reducer.

How to Make Film Credits in After Effects, Fast
A step by step guide to building a finished film credit roll in After Effects with the Credits plugin. Drop in your cast and crew with block types or a producer spreadsheet, pick a style, set the exact runtime, and click Generate Credits.

Why Plugins Accelerate Learning Workflow for Editors
Why plugins accelerate an editor's workflow and learning: how automating repetitive tasks frees your attention for the creative decisions that build skill.

How to Make Proximity Animations in After Effects (No Keyframes)
Push a single controller through a field of layers and watch them scale, move, fade, and shift color based on how close it gets, with no per-layer keyframing. This is how to build distance-based proximity animations in After Effects using ProXimity.

Motion Graphics Curriculum: A Student's Complete Guide
A student's complete guide to the motion graphics curriculum, from design foundations and animation principles to software mastery and showreel production.

Learn After Effects Motion Graphics Basics Fast
Discover how to learn After Effects motion graphics basics quickly! Master key concepts and create stunning animations today.

Credits Demo: Build a Credit Roll in After Effects from a Panel or a Spreadsheet
A full tour of Credits, the credit roll generator for After Effects. Build your credits in a panel or import them from a CSV or Excel template, preview the exact look, fit the roll to any duration, then click Generate Credits to drop a finished comp into After Effects.

Adobe Dynamic Link Explained for Video Editors
Unlock efficiency with Adobe Dynamic Link. Learn what Adobe Dynamic Link does and streamline your video editing workflow today!

ToolKit Demo: Screenshots, Anchor Tools, and Guides in One After Effects Panel
A full tour of ToolKit, the utility panel for After Effects. Capture comp screenshots as PNG or JPEG to a custom folder, fix off center anchor points, align and scale layers to the comp, and drop in rule of thirds, golden ratio, and safe zone guides from one panel.

How to Translate an After Effects Project Automatically (TextPilot)
A step by step tutorial on auto-translating an entire After Effects project from English to another language with TextPilot. Scan the project, translate every text layer in one pass, then hot-swap between languages whenever you need them.

How to Spell Check in After Effects (TextPilot)
After Effects has no native spell check, so typos slip into client deliverables far too easily. This guide shows how to scan every text layer in your project and fix spelling mistakes with TextPilot, the text manager for After Effects.

Design Animated Infographics in Premiere Pro
Learn how to design animated infographics in Premiere Pro easily. Enhance your videos with professional data visuals without After Effects!

CallOuts Demo: Animated Callouts That Track Moving Objects in After Effects
A full tour of CallOuts, the animated callout plugin for After Effects. Drop in pointer lines and labels with one click, track what they point at, shape the path, retime the draw on with real keyframes, and connect as many targets as you want.

GridMaker 2.0 Demo: Build Flat, 3D Spatial, and Path Grids in After Effects with Advanced Mode
A fast tour of GridMaker 2.0 for After Effects and its new Advanced Mode, a visual grid designer. Build flat grids, 3D spatial grids, and path based grids of your footage, then Apply to Selection or Create New Comp.

How to Make Animated Grids of Footage in After Effects (GridMaker)
A step by step tutorial on building animated flat grids of footage in After Effects with GridMaker. Lay out your cells, animate them with timing and stagger, shape them, then apply the grid to your own clips in one click.

How to Animate Footage Along a Path in After Effects (GridMaker)
A step by step guide to building tiled animations that follow a path, like a circle, in After Effects with GridMaker. Use a shape preset or import a path you draw, then run your GIFs or footage around it.

How to Make a 3D Sphere of Footage in After Effects (GridMaker)
A step by step tutorial on building a rotating 3D sphere of footage in After Effects with GridMaker. Use Advanced Mode and 3D spatial to pick a shape, dial in the radius and tiles, then generate the comp and drop your clips in.

Role of Keyframes in Animation: A Creator's Guide
Discover the crucial role of keyframes animation in creating smooth, dynamic visuals. Master keyframes and elevate your animation skills today!

ProXimity Demo: Distance-Reactive Animation in After Effects, No Keyframes Needed
A full tour of ProXimity, the distance-reactive animation plugin for After Effects. Drop a controller into your comp and your layers scale, blur, shift color, fade, and move on their own as it passes, with no keyframes on the layers.

Create Gaming Intro Animations in After Effects
Learn how to create gaming intro animations in After Effects with this step-by-step guide. Elevate your content's professionalism and energy!

Reducer Demo: Safely Delete Unused Footage, Comps, and Solids in After Effects
A full tour of Reducer, the project decluttering plugin for After Effects. Pick your main comps, scan for unused footage, dead comps, and forgotten solids, then delete the junk safely. Expressions and child comps are respected, and optional keep folders protect what the scan should never touch.

After Effects Callout Animation Examples for Designers
Discover inspiring after effects callout animation examples that elevate your designs. Master engaging visuals for tutorials and demos!

Organizer Demo: Sort Your After Effects Project Panel into Folders in One Click
A full tour of Organizer, the project cleanup plugin for After Effects. Sort your whole project panel into folders in one click, flatten empty folders, batch rename with a live preview, and toggle, label, and lock layers by type.

After Effects Workflow Best Practices for Motion Designers
Unlock your creativity with After Effects workflow best practices! Discover how effective project management enhances speed and collaboration.

Sourcer Demo: Royalty Free Stock Footage and Photos Inside Premiere Pro and After Effects
A full tour of Sourcer, the stock media panel for Premiere Pro and After Effects. Search Pexels, Unsplash, and Pixabay, then insert royalty free photos and 4K video onto your timeline in one click.

Media Management in Premiere Pro: A Practical Guide
Discover what is media management in Premiere Pro and learn vital strategies to keep your projects organized and efficient. Click for insights!

JumpCut Demo: Remove Silence From Your Premiere Pro Timeline Automatically
A full tour of JumpCut, the silence remover for Premiere Pro. Pick your audio tracks, preview every cut on one waveform, tune the threshold and padding, and let it cut and ripple delete all the dead air in one click.

Eye-Catching Text Animation Examples for Creators
Discover 10 compelling eye-catching text animation examples that transform static words into dynamic designs. Captivate your audience today!

GIFer Demo: Search and Insert GIFs Inside Premiere Pro & After Effects
A full tour of GIFer, the GIF panel for Premiere Pro and After Effects. Search Giphy from inside your editor, browse trending and categories, save favorites that sync between both apps, and insert GIFs into your timeline in one click.

Parenting Layers in After Effects, Explained
Master parenting layers in After Effects explained! Learn how to link layers for seamless animations and unlock your creative potential.

How to Make Split Screens & Video Walls in After Effects (GridMaker)
Build side by side split screens, stacked rows, and video walls in After Effects, with GridMaker auto fitting every clip to vertical comps for Instagram in one click.

Filmit Studio Demo: One App to Install and Manage Every Plugin
A full tour of Filmit Studio, the free desktop app that installs, activates, and updates every Filmit plugin for After Effects and Premiere Pro from one login, with a built in LUT library and a license manager.

TextPilot Demo: Manage Every Text Layer in Your After Effects Project
A full tour of TextPilot, the text manager for After Effects. Scan your whole project, then bulk edit, find and replace, translate for free, swap fonts, and spell check every text layer from one panel.

GridMaker Demo: Build Split Screens & Video Walls in After Effects in One Click
A full tour of GridMaker, the one-click grid plugin for After Effects. Turn any footage into a split screen or video wall, with padding, rounded corners, gap colors, presets, and vertical layouts for social.

Timeline Panel in Premiere Pro, Explained for Editors
A complete guide to the Premiere Pro timeline panel — the essential tools, shortcuts, customization, and advanced features that make editors faster.

Getting Started with GridMaker: Build Grids & Video Walls in After Effects
Build grids, split screens, and video walls in After Effects in one click, with padding, rounded corners, editable pre-comp cells, and vertical comps that auto-fit Instagram and TikTok. A full getting started guide to GridMaker.

Motion Graphics for Corporate Presentations: 7 Techniques That Work in 2026
Seven motion-graphics techniques that make corporate presentations clearer and more polished — titles, data, callouts, brand color — and the tools to build them fast.

How to Set Up Your Sourcer API Keys (Pexels, Unsplash, Pixabay)
Create free Pexels, Unsplash, and Pixabay API keys and paste them into Filmit once so Sourcer can search and insert royalty free stock footage and images inside After Effects and Premiere Pro.

Offline vs Online Editing: The Role of Each in a Modern Workflow
Offline vs online editing explained — what each stage does, how proxies work, why the split still matters in 2026, and how to move cleanly from rough cut to delivery.

Getting Started with Sourcer: Stock Footage Inside After Effects & Premiere Pro
Search Pexels, Unsplash, and Pixabay and insert royalty free footage straight onto your After Effects or Premiere Pro timeline. A full getting started guide to Sourcer.

Top 5 cutback.video Alternatives for 2026
cutback.video alternatives compared: AI auto-editors vs. plugins that supercharge Premiere Pro. What each does, what they cost, and our pick.

How to Add GIFs in Premiere Pro: Getting Started with GIFer
Search Giphy and drop GIFs straight onto your Premiere Pro timeline with GIFer, a panel that handles import, sizing, and frame rate so reaction GIFs land ready to position.

Types of Motion Graphics Plugins: 2026 Editor’s Guide
The four types of motion graphics plugins — workflow automation, VFX suites, 3D integration, and AI/UI tools — what each does and how to actually choose.

How to Add GIFs in After Effects: Getting Started with GIFer
Search Giphy and drop animated GIFs straight onto your After Effects timeline with GIFer, including API key setup, MP4 or GIF output, favorites, and one-click gridding.

Getting Started with GIFer: Insert GIFs in After Effects & Premiere Pro
Search Giphy and drop GIFs straight onto your After Effects or Premiere Pro timeline, with favorites that sync across both apps. A full getting started guide to GIFer.

Manage Media Assets in Premiere Pro: 2026 Guide
Organize bins, relink offline media without breaking a Team Project, and automate imports — a practical guide to managing media assets in Premiere Pro.

The Role of Text Animation in Viewer Engagement
When to animate text and when static wins — how kinetic typography guides attention, plus the presets that work in Premiere Pro and After Effects.

LUTs as Creative Reference: How Editors and Colorists Use Them for Direction
LUTs are not a replacement for hand-grading. They are a creative reference, the same way stock music helps a composer feel out direction before writing original cues.

Log vs Rec.709: The One Mistake That Ruins Every LUT You Apply
If your LUTs look muddy, washed out, or just wrong, it is almost never the LUT. It is the order of operations. Here is the fix in one read.

5 Iconic Movie Color Grades You Can Recreate in Your Edit
The Godfather, Kill Bill, Pulp Fiction, Die Hard, Saving Private Ryan. Five films with five unmistakable color signatures, broken down with LUT examples you can drag onto a reference scene.

Teal & Orange Explained: Why Every Hollywood Movie Looks the Same
Transformers, John Wick, Sicario, half of every Marvel film. The teal-and-orange grade is everywhere. Here is why it works, when it doesn’t, and how to apply it without making your edit look like everyone else’s.

How to Get The Matrix’s Iconic Green Look in Premiere Pro
The Matrix’s green-tinted color grade is one of the most copied looks in modern cinema. Here’s how to build it in Lumetri, and the LUT shortcut when you don’t have time.
From Drafts to Deliverables: How Sourcer Cuts Your Stock-Footage Workflow in Half
Stop tab-juggling Pexels, Unsplash, and Pixabay. Search every library at once, hover-preview videos, and drop straight onto the timeline.
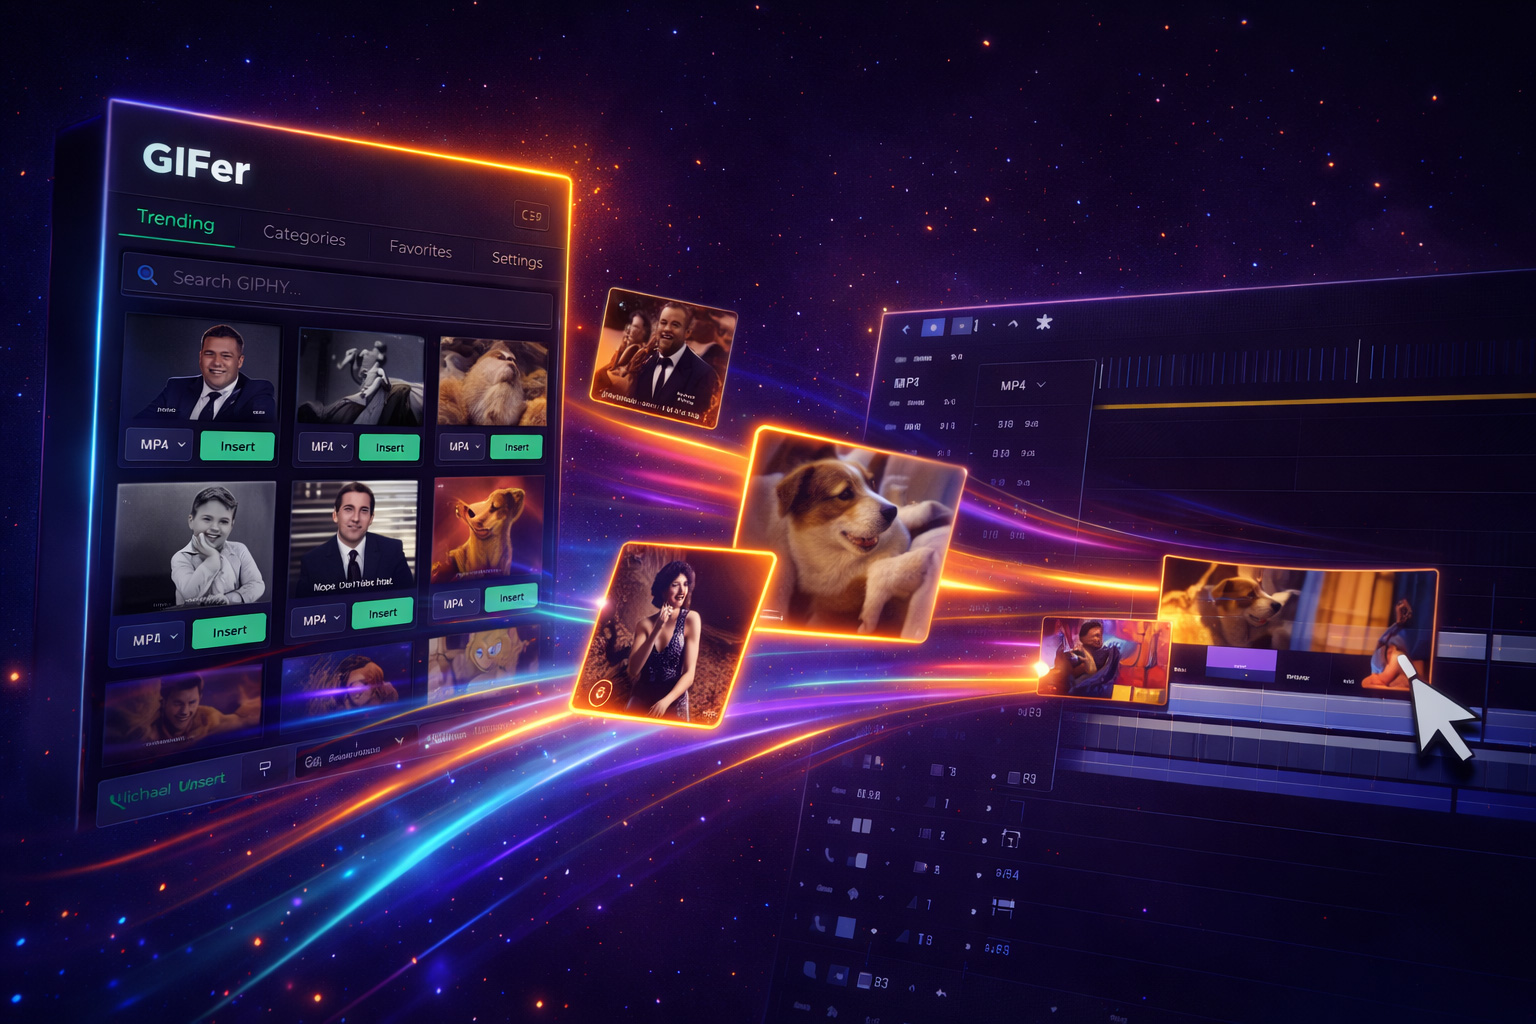
Stop Alt-Tabbing: Add GIFs to Your Timeline in One Click
GIFer lets you search GIPHY and Tenor and drop GIFs directly onto your timeline — no browser, no download hassle.
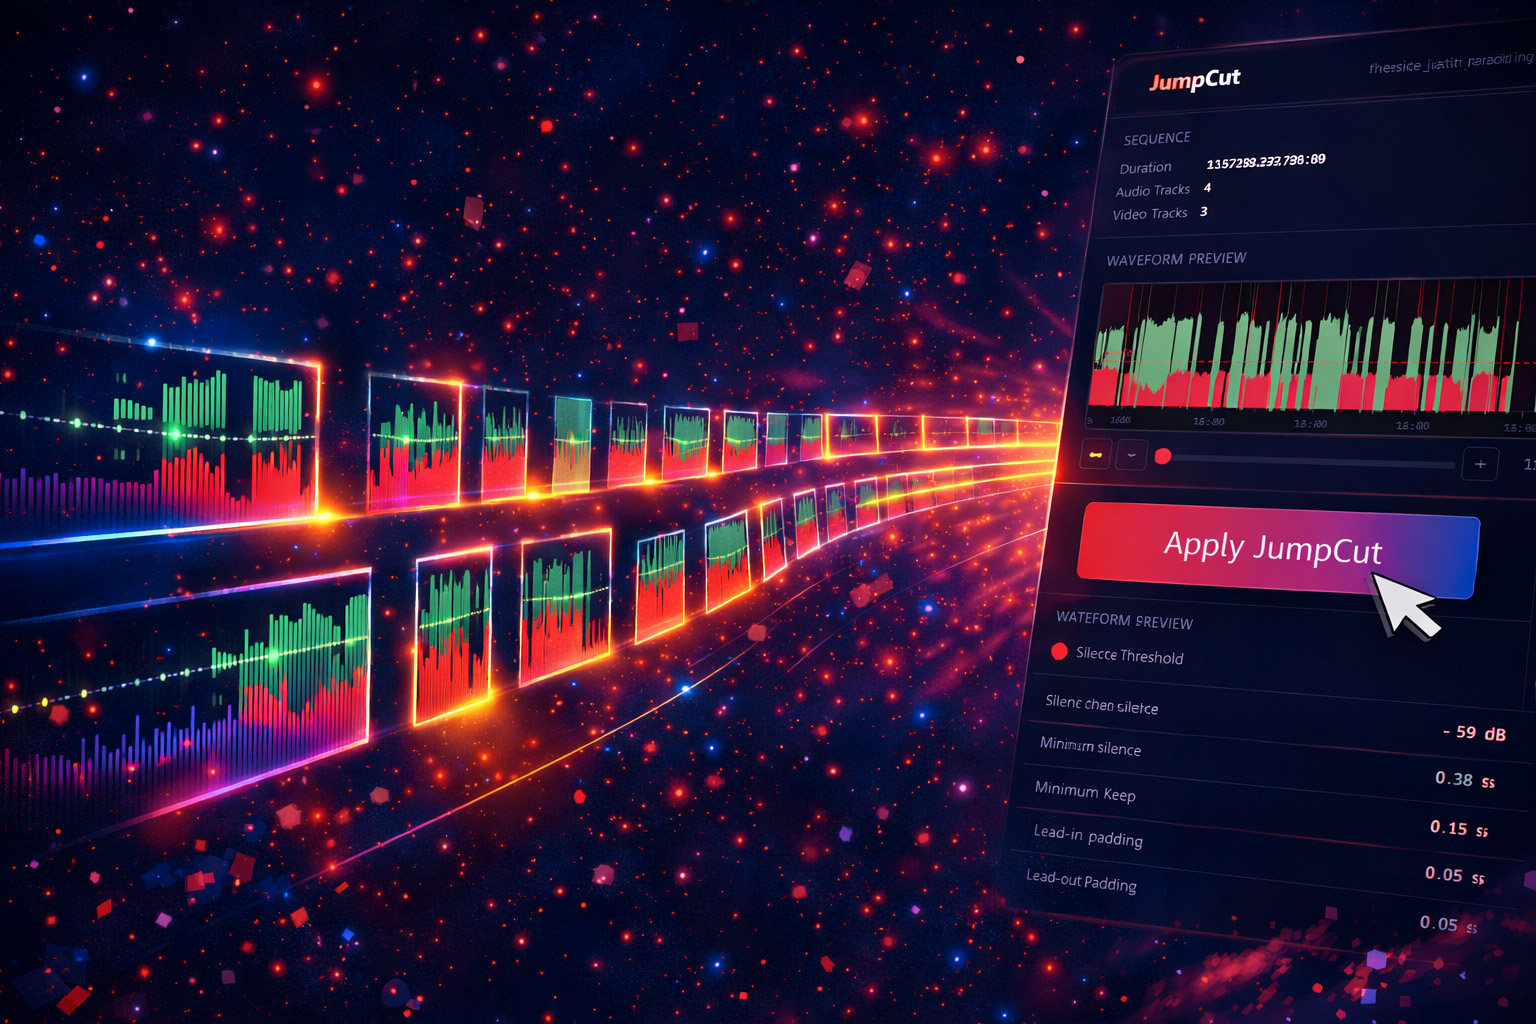
Kill Dead Air Automatically: JumpCut for Premiere Pro
JumpCut auto-detects silence, dead air, and awkward pauses in your footage and removes them in seconds.

Bulk Text Management in After Effects: Meet TextPilot
Scan, search, replace, translate, and manage every text layer across an entire AE project from one panel.
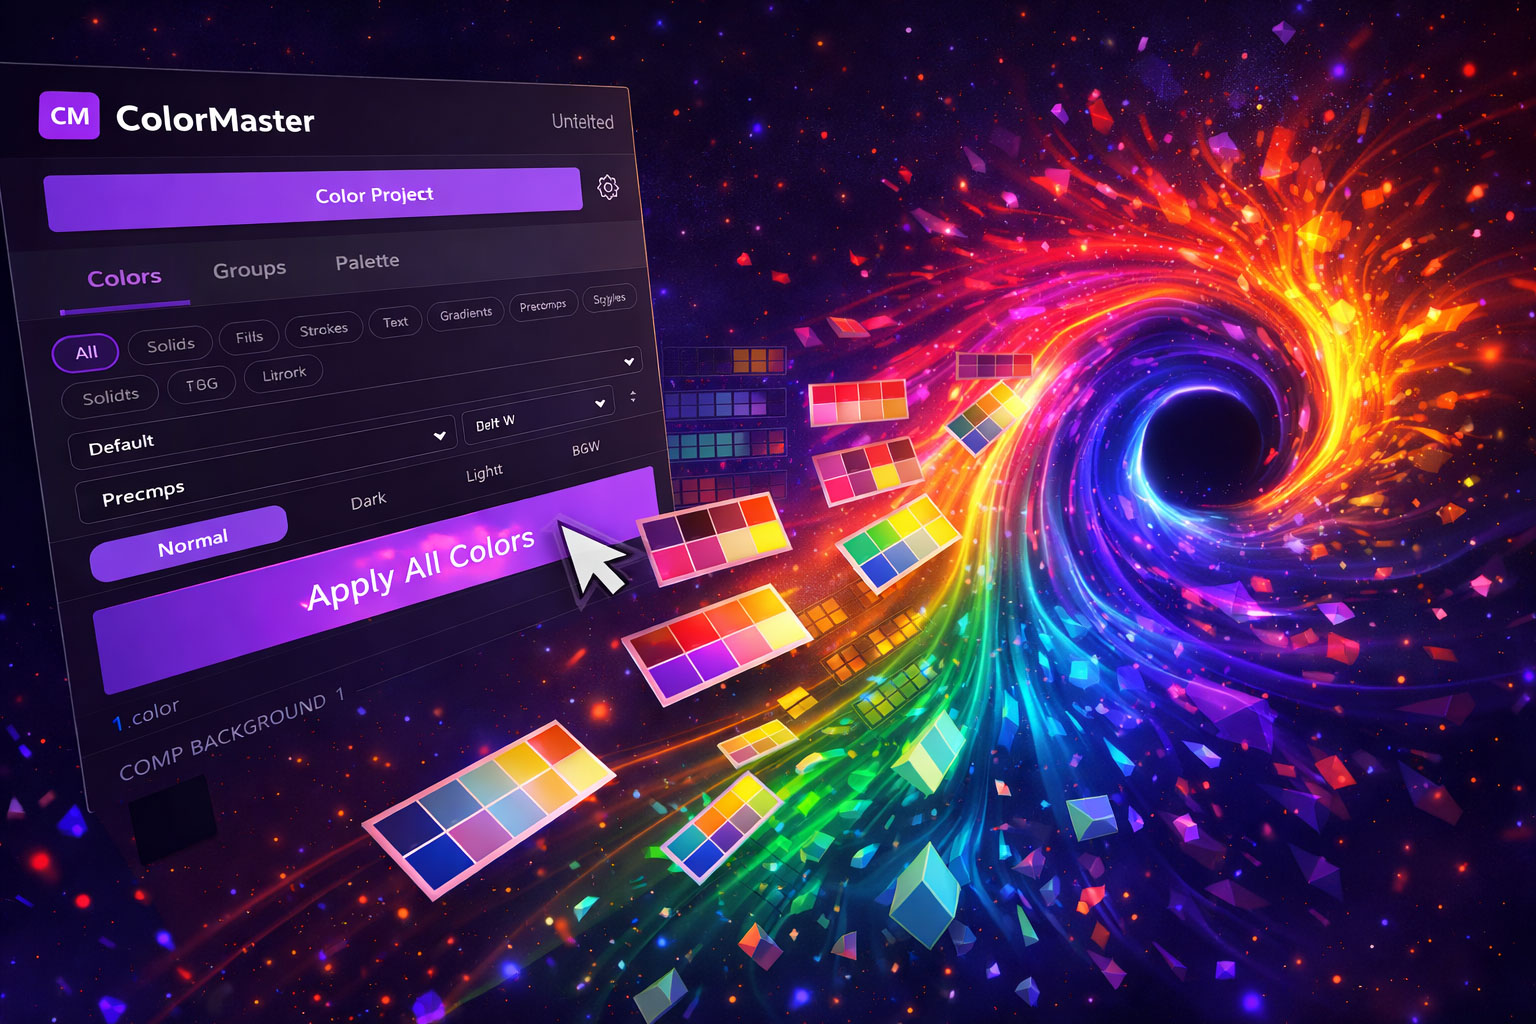
One Panel to Rule All Your Colors in After Effects
ColorMaster scans your project, centralizes every color, and lets you change any color project-wide with a single click.

Animated Callouts That Track Moving Objects in After Effects
CallOuts adds animated annotation callouts with custom labels, lines, and pointers — zero keyframe headaches.
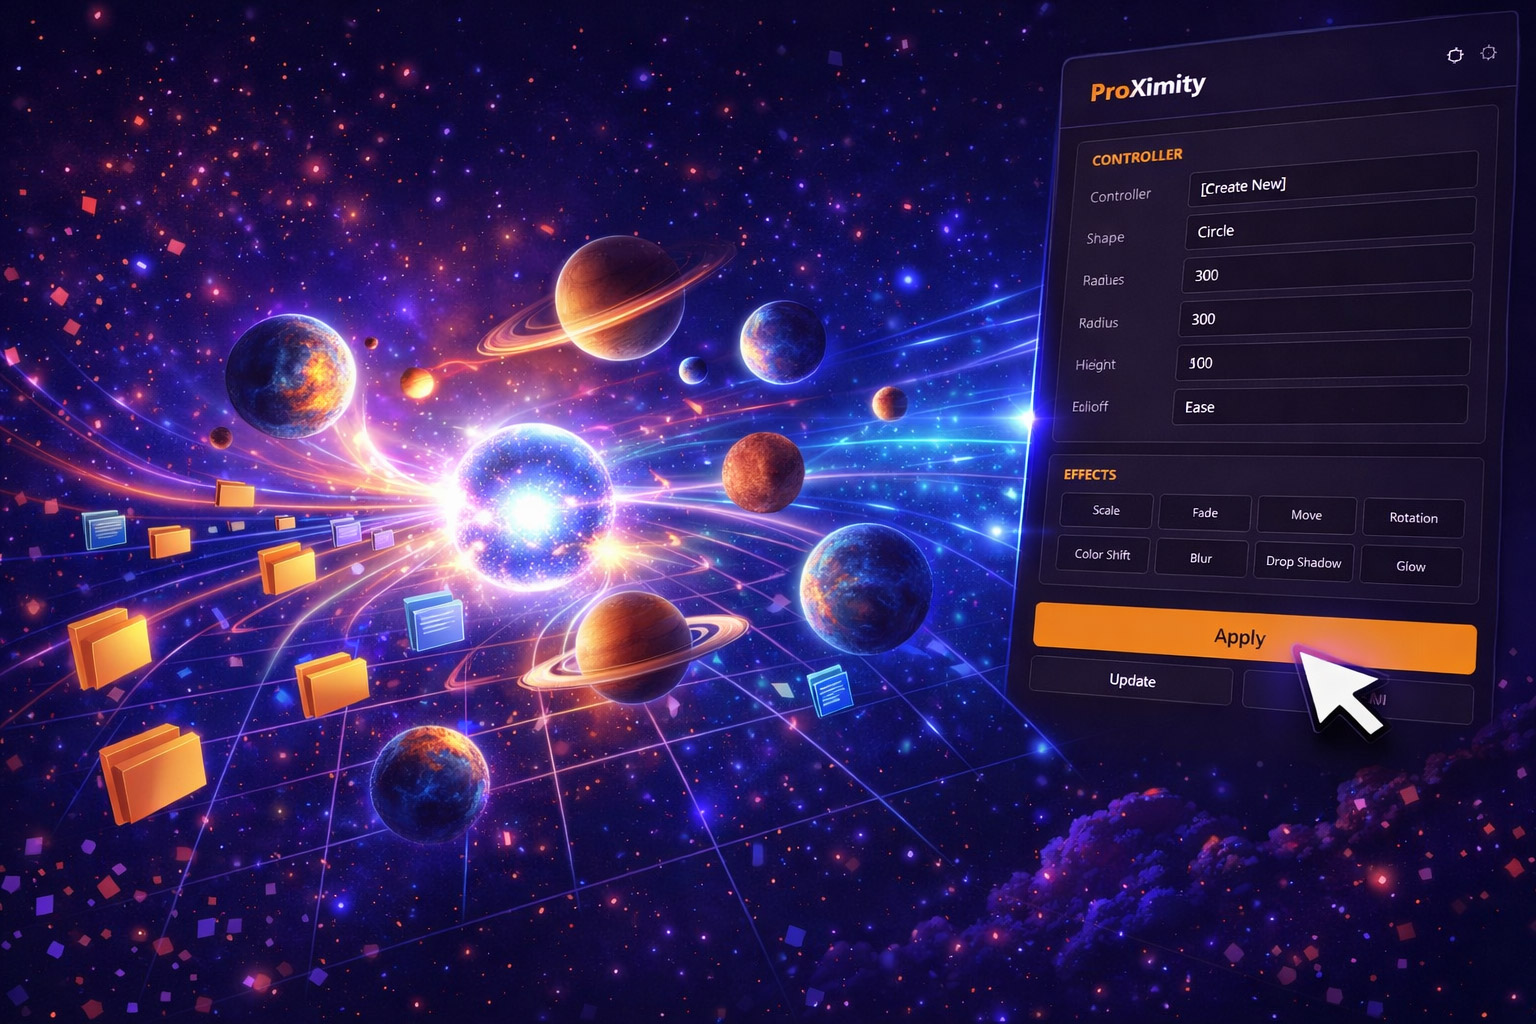
Distance-Reactive Animation in After Effects with No Keyframes
ProXimity adds proximity-based animation — layers scale, fade, and shift based on their distance from a controller.
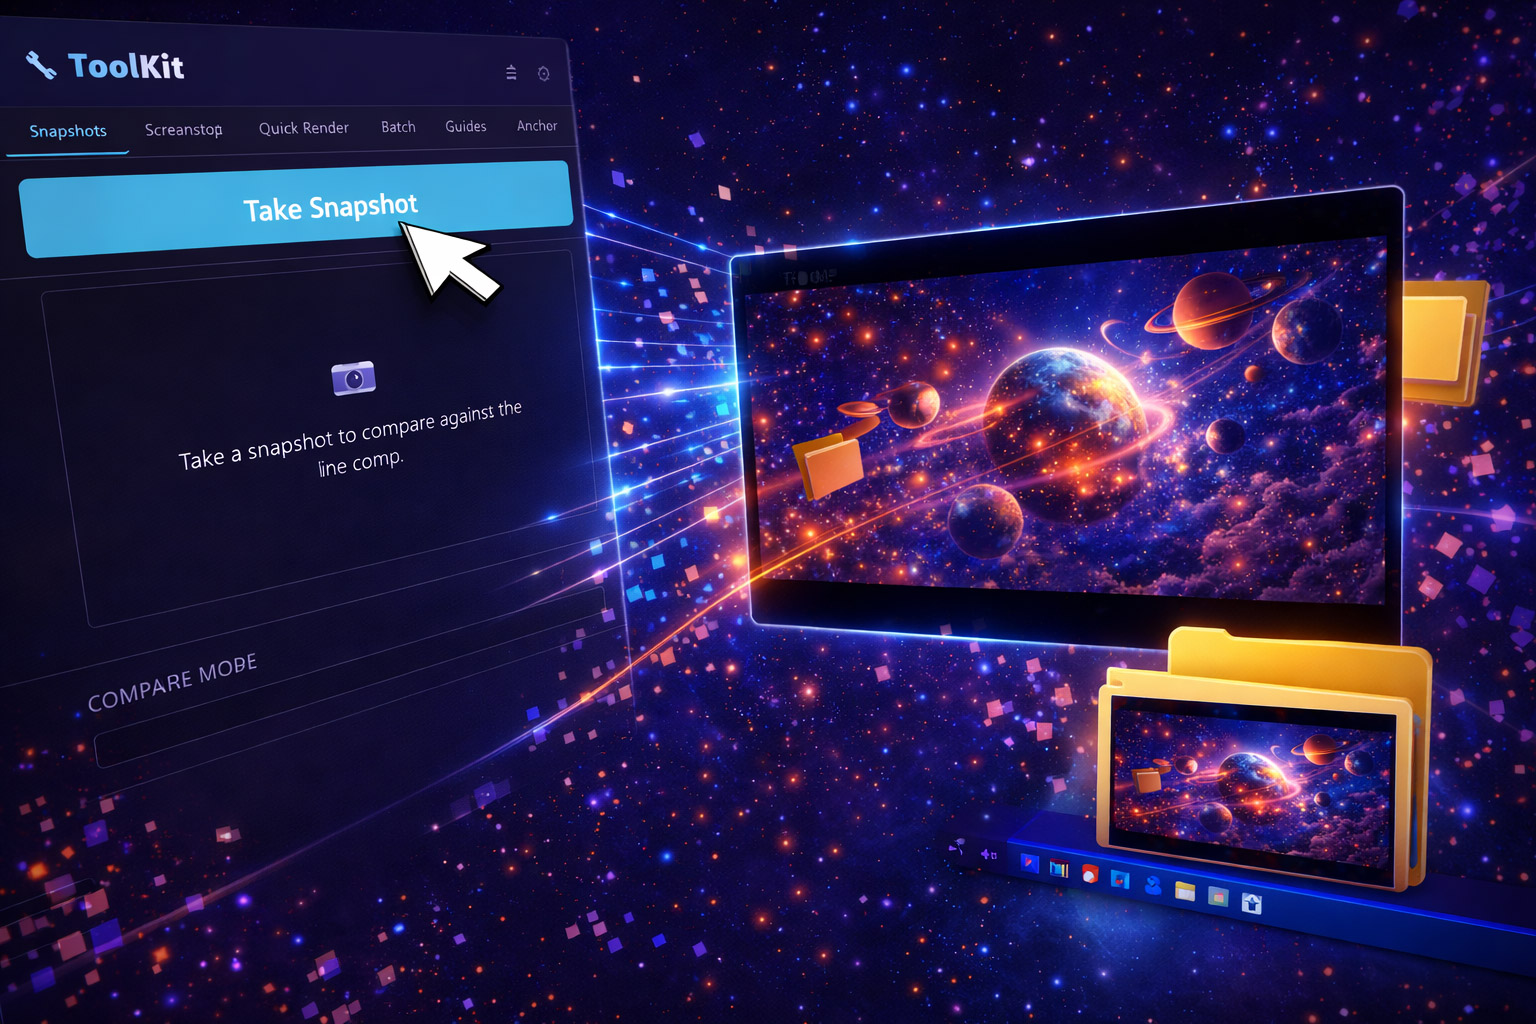
ToolKit: The Creative Utility Belt for After Effects
Snapshots, Quick Render, Batch Processor, and Guide System — four essential AE utilities in one panel.
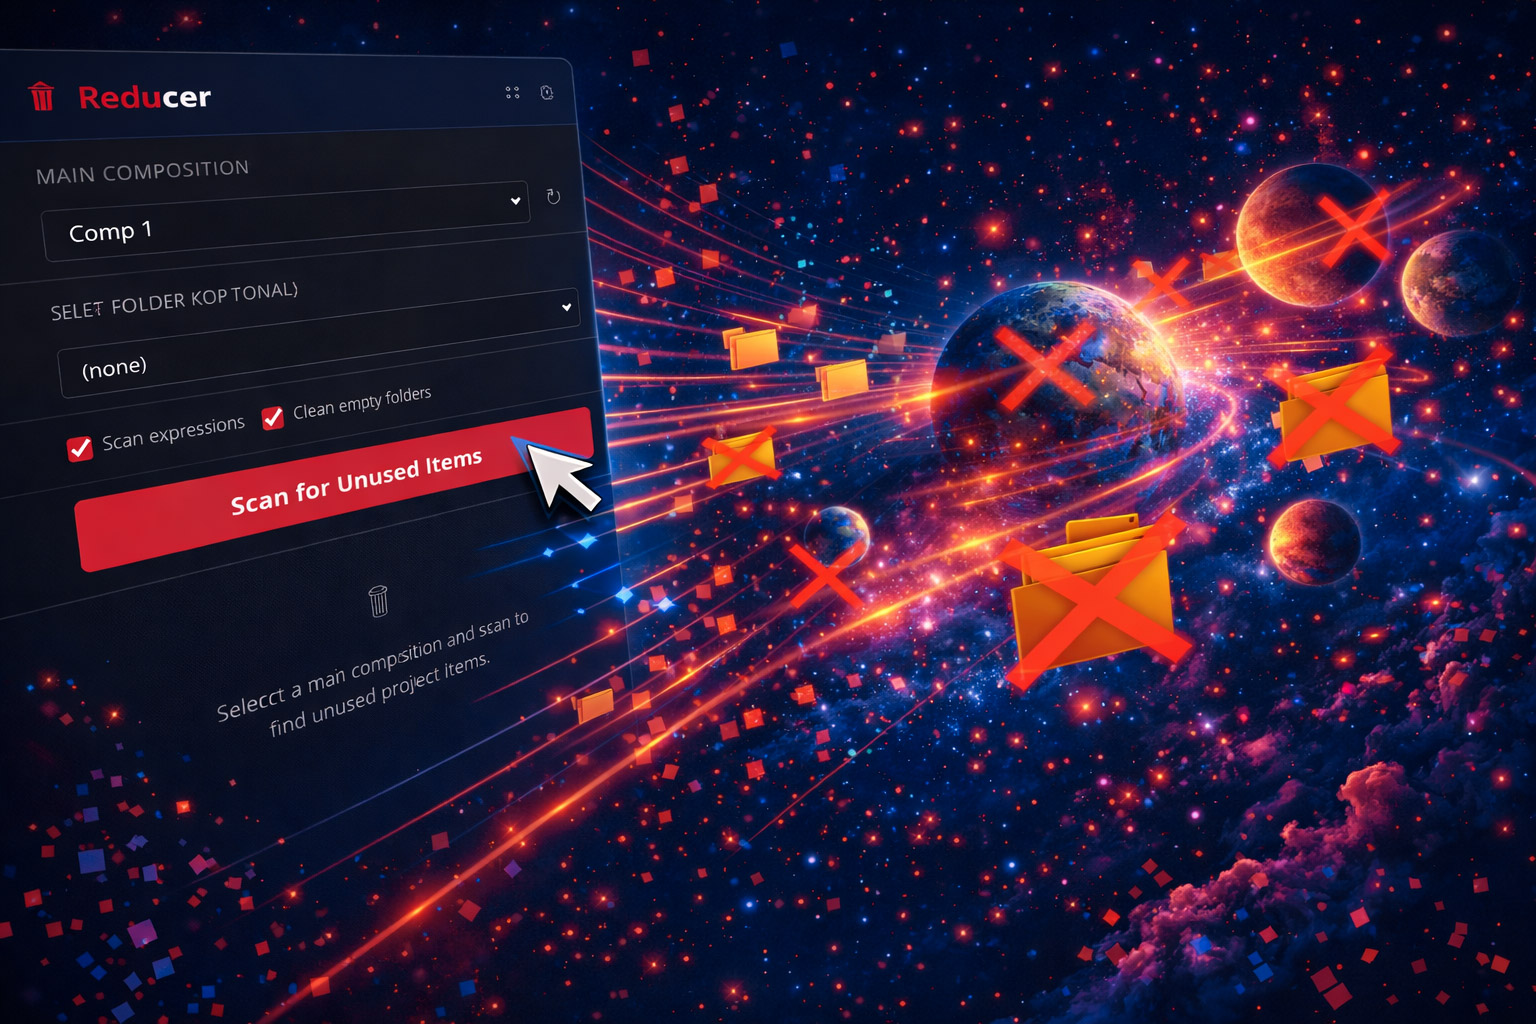
Declutter Your After Effects Project in One Click
Reducer scans your AE project and removes unused footage, solids, and precomps. Smaller files, cleaner projects.
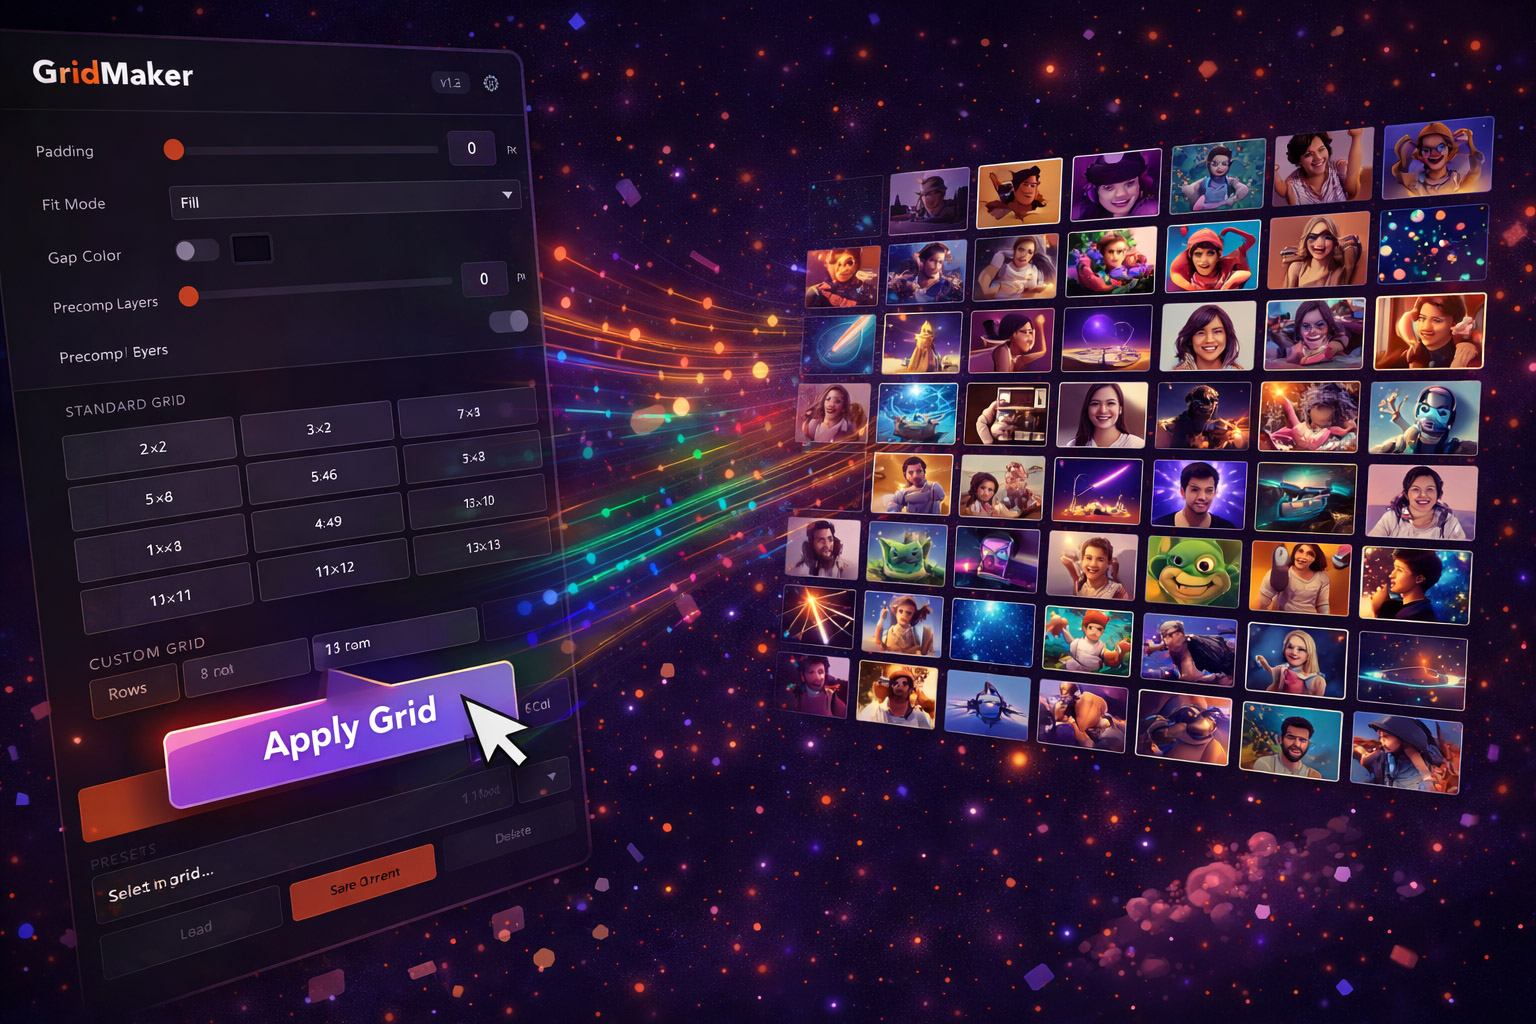
Build Video Grids in After Effects Instantly with GridMaker
2x2 to 12x12 video grids with custom padding, gap colors, and automatic layer organization — in seconds.

Auto-Sort and Clean Your After Effects Project Panel
Organizer automatically sorts, labels, and cleans up your AE project panel. One click from chaos to structure.
Film Grain, Light Leaks & Vignettes — 1080p to 8K
Real-feeling cinematic overlays for After Effects and Premiere Pro. Stackable, scalable, up to 8K resolution.
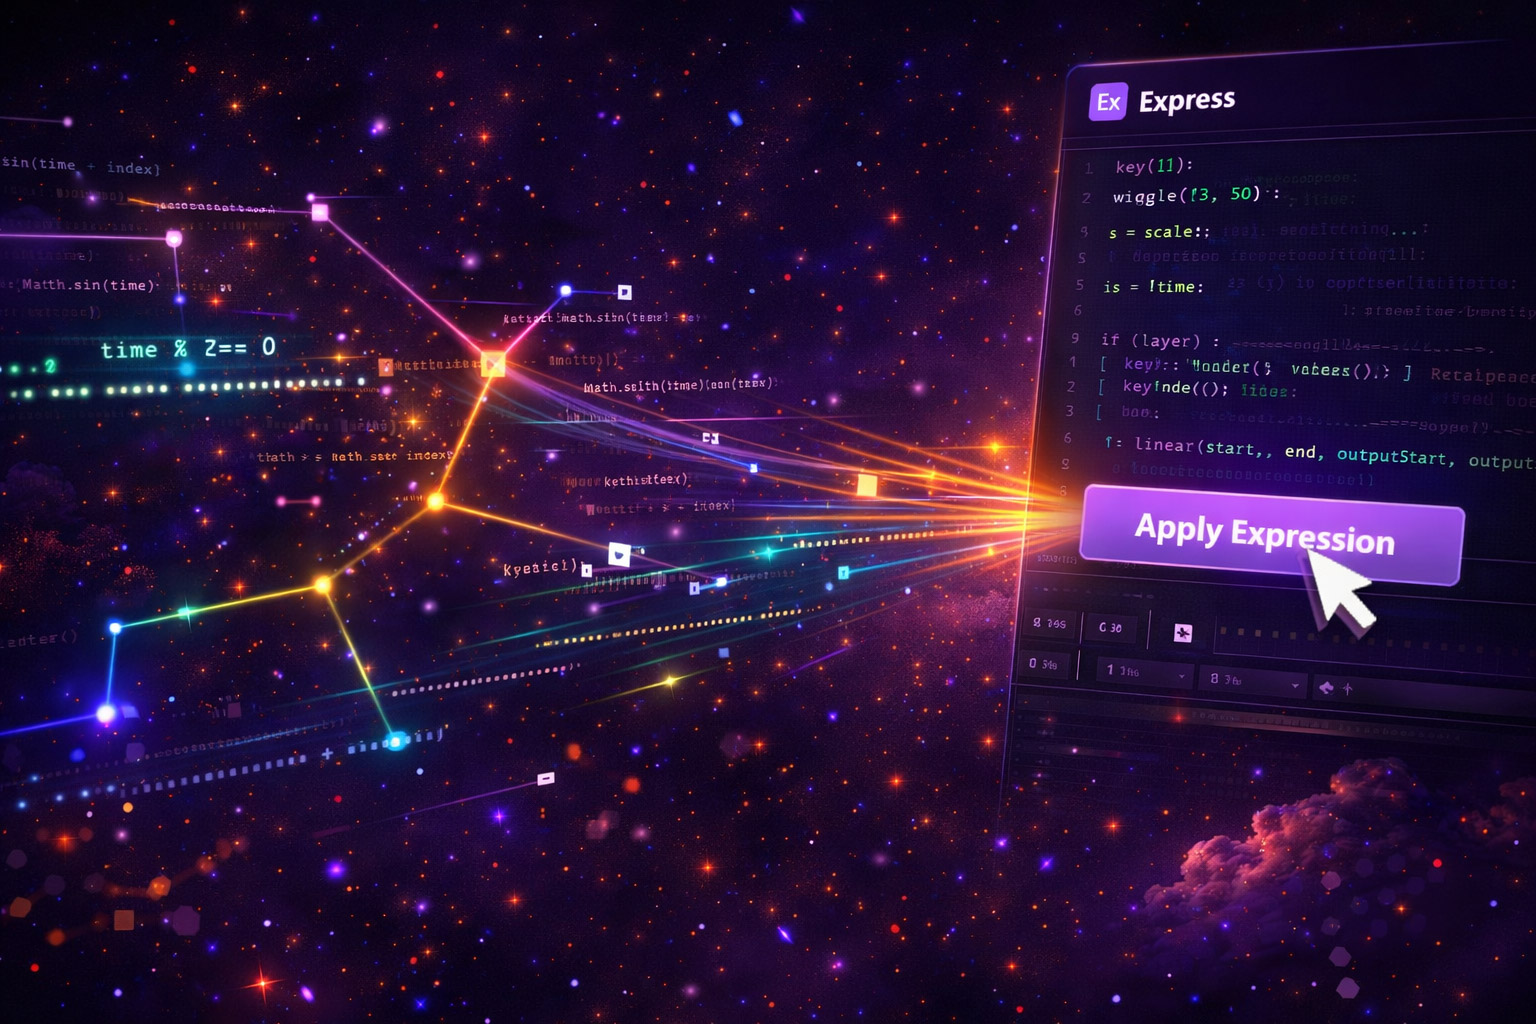
38+ After Effects Expressions Without Writing a Single Line of Code
EXpress is a one-click expression library — loops, bounce, wiggle, typewriter, and more — with custom parameters.

Whip Pan & Cinematic Transitions for Premiere Pro — Drag and Drop
A hand-picked pack of whip pan and cinematic transition effects for Premiere Pro. Drag, drop, done.

How to Add GIFs to Your Videos in Premiere Pro
The fastest method to browse, search, and insert GIFs directly into your Premiere Pro timeline.

Nikon ZR Review: Why This Affordable Powerhouse Has My Attention
A budget-friendly cinema camera with internal 6K REDCODE RAW — does it live up to the hype?

The Ultimate Beginner's Guide to Adobe Premiere Pro (2025 Edition)
Everything you need to go from zero to confident editor — covers the interface, importing, cutting, transitions, audio, and exporting.

How We Recreated the Stranger Things Intro in After Effects
Step-by-step breakdown with a free template and the tools we used to build it.

How to Create a Simple Map Animation in After Effects
Draw animated travel lines, pin markers, and map routes using built-in After Effects tools.

How to Make a Map Line Animation with Filmit CallOuts
Create professional animated callouts and map lines without manual path work.

Filmit CallOuts: Create Professional Callout Titles in After Effects in Seconds
Connected lines, elbows, and labels — all expression-driven and fully customizable.

How to Make Viral Bigfoot AI Videos with ChatGPT and Veo 3
Use ChatGPT for dialogue and Google Veo 3 for footage to create AI-powered viral content.

Create a Scatter Text Effect in After Effects with CC Scatterize
Use CC Scatterize to create dynamic, explosive text animations for logos and intros.

How to Use Color Master in After Effects for Effortless Color Control
Centralize every color in your project and update them all from one panel.

Master Your Project Colors in After Effects with Filmit Color Master
The smart solution for managing complex color workflows in inherited or large-scale projects.

Reduce Your After Effects Project Without Breaking It
Safely clean up unused footage, comps, and solids while preserving expression-driven layers.

GridMaker: The Ultimate Grid Layout Tool for After Effects
Build 2x2 to 12x12 video grids in one click. Split screens, video walls, and more.

How to Use the Track Select Forward Tool in Premiere Pro
Select everything after the playhead and shift your entire edit forward in one click.

How to Replace Clips in Premiere Pro Without Losing Effects
Swap footage while keeping all your color correction, transitions, and motion settings intact.

How to Extend or Shorten Music with the Remix Tool in Premiere Pro
Automatically adjust any music track to match your video length with AI-powered remixing.

How to Nudge Clips in Premiere Pro Frame by Frame
Precision editing for syncing audio, tightening cuts, and fine-tuning transitions.

How to Mute or Hide All Tracks in Premiere Pro
Isolate specific tracks in complex timelines using one keyboard shortcut.

How to Isolate One Color in Premiere Pro
Create a dramatic color pop effect — everything grayscale except one vivid color.

How to Fade Audio In and Out in Premiere Pro
Create smooth audio transitions to avoid jarring starts and stops in your videos.

How to Create and Use Proxies in Premiere Pro
Edit high-resolution footage smoothly by creating lightweight proxy files.

How to Add a Vignette in Premiere Pro
Darken the edges of your frame for a cinematic or stylized look using Lumetri Color.

How to Make Footage Black and White in Premiere Pro
Convert footage to grayscale using Lumetri Color for dramatic or stylistic effect.

How to Use the Snapping Tool in Premiere Pro
Align clips precisely and prevent gaps in your timeline with magnetic snapping.

How to Create a Solid Background in Premiere Pro
Add color matte backgrounds for title cards, text overlays, and lower thirds.

How to Loop Playback in Premiere Pro
Enable continuous preview of a specific section for timing and fine-tuning.

How to Blur Faces in Premiere Pro
Track and blur faces to protect identities using masks and the Gaussian Blur effect.

How to Use the Generative Extend Tool in Premiere Pro
AI-powered tool that generates extra frames to extend clips beyond their original length.

How to Enhance Audio in Premiere Pro Using AI
Use the Essential Sound panel to clean up dialogue and improve audio quality with one click.

How to Create Handheld Camera Movement in Premiere Pro
Simulate natural handheld shake on static footage — no plugins needed.

How to Fade to Black in Premiere Pro (The Cinematic Way)
Professional fade-to-black technique used in commercial productions.

How to Freeze Frame in Premiere Pro for Titles or Dramatic Moments
Pause footage at any point for title cards, dramatic emphasis, or character intros.

How to Copy and Paste Multiple Effects in Premiere Pro
Apply identical effects across multiple clips simultaneously with keyboard shortcuts.

How to Remove a Green Screen in Premiere Pro
Key out green backgrounds cleanly using the Ultra Key effect — no After Effects required.

How to Reverse a Clip in Premiere Pro
Play footage backwards for creative reveals, transitions, and stylistic effects.

How to Transcribe and Export Text from Premiere Pro
Generate transcripts for captions, scripts, and client review directly in the timeline.

How to Create a Split Screen in Premiere Pro
Side-by-side clip layouts for comparisons, reactions, or multi-cam views — no plugins needed.

How to Color Match Footage in Premiere Pro
Use the automatic color match feature to achieve visual consistency across mixed footage.

How to Instantly Improve Your Audio with Adobe's AI Tool
One-click audio enhancement using Adobe's built-in AI-powered tools.

How to Add a Clean Zoom Effect in Premiere Pro Using the Transform Tool
Smooth, professional zoom punches using native Premiere Pro tools.

How to Normalize Loudness for YouTube & Podcasts in Premiere Pro
Get your audio levels right for every platform using loudness standards.
New tutorials, tool releases, and filmmaking tips straight to your inbox. No spam, unsubscribe anytime.